Contributed by: Yourememberme?
This FAQ will detail some inexpensive methods to
provide good lighting for small subjects. The techniques
presented here are best applied to subjects that can be
brought into an environment where lighting can be
controlled, but can also be applied to natural subjects.
Four methods of adding light to a
subject: (3 involve flash)
The light from a
flash is preferred because it can be controlled, and the
color temperature of the light it produces is constant.
Lighting a subject depends on the position of the flash
units. With proper lighting, details dramatically stand
out and colors are extremely precise.
1.
Built-in Flash Most digital cameras have a flash
mounted right on the body. A built-in flash can be used
in combination with other flash systems to provide even
and non-directional lighting.
Most cameras allow
the built-in flash to fire in macro mode; however, the
close proximity of the flash to the subject may cause
over saturation. In this case, the light should be
attenuated (a couple of methods are explained further).
Lighting options are more restricted for cameras
that do not allow macro-mode flash.. Incandescent
lighting is required, and usually some way to diffuse
the light (See Incandescent light below)..
A
built-in flash tends to cause harsh shadows. This might
be acceptable, but if the aim is to provide even
lighting, then some way must be used to reflect some of
the flash light around the subject (See ?Reflective box?
below).
2. Slave flash Inexpensive
(and basic) slave flash units can be purchased readily.
They are designed to fire at full power the moment it?s
sensor detects a flash firing. It has a tripod mount,
and is turned on simply by lifting the head. They can
take up to 1 minute to recharge.
Slave flash
units may not work with all digital cameras (Notably
Olympus, Canon and Nikon).
The output from a
slave flash may be hard to control (because it always
fires at full power) without some light absorbing
material (use neutral density filters as a backdrop), or
by dispersing the light from the flash.
3.
Remote Trigger Flash Two elements are required:
a remote flash trigger, and a stand alone flash unit.
These expensive items are readily available in camera
stores.
The remote trigger senses the flash from
the camera and triggers the flash attached above. The
system is simple and reliable, converting the light of
the main flash to electrically trigger the flash to
which the remote is attached.
I recommend the
Vivitar 3000DT flash ($70 CDN, $45 US, 50? ). This flash
system is one of the least expensive, but still offers a
manual zoom head which can be adjusted for coverage
between 28mm and 85mm, and 3 power settings. The trigger
($22 CDN, $14 US, 15.50 ? ) is off-the-shelf, and works
with all flash units.
The remote trigger is
mounted on a mini-tripod, with the flash attached to it.
Mini tripods are practical, but not critical
(Mini-tripods range $10 to $50+).
The
combination of a quality flash unit and a remote trigger
will work with the vast majority of cameras, including
those that have a millisecond delay before firing the
main flash burst.
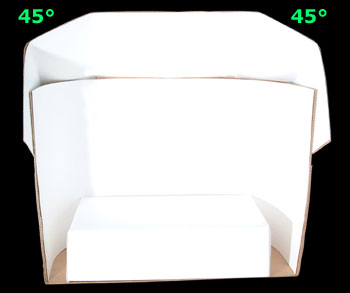
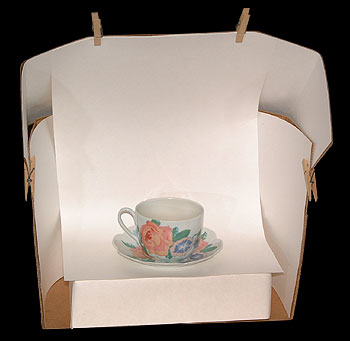
Reflective box
contruction:
While a plain
colored surface can be used underneath and behind the
ubject to be photographed, the light will remain
strongly directed from the front. A cheap and effective
method to reflect and diffuse light is to use a simple
box lined with white poster board. The box is placed on
white card stock which is sufficiently large so as to
hide the background and make it invisible in the frame.
For cameras that have a user selectable white
balance option, the white balance can be set for the
combination of flash units and the white of the
reflector box. This will usually yield more accurate
colors.
If 2 extra slave units are used, then it
becomes even easier to shoot without shadows.
Furthermore, the extra flash units provide excellent
lighting, even outdoors.
4. Incandescent
light For those cameras that automatically turn
off the flash when the macro mode is engaged, the only
workable alternative is incandescent lighting (halogen
in particular).
Incandescents are difficult to
use as they tend to create visual "hot spots"; however,
when used in conjunction with a reflecting box, hot
spots can be controlled to a great extent.
The
lamp base should be whatever is practical or economical,
but the socket should be able to take standard bulbs.
Reflector bulbs are best as they focus light; at least
two 50 Watt bulbs should be used.
The resulting
images can be almost as good as those created using
flash, but may require additional image processing using
software to enhance the saturation and brighten the
image.
Setting the white balance according to
the temperature of the lights is critical to obtain
faithful colors. Often photos captured under
incandescent light appear warmer, even with the correct
white balance, and less "staged" than using flash. This
is due in large part to the lower light intensity, and
different lighting color sources.