Contributed by:
Burramys Parvus
Thanks to:
11leafedleaf Submitted:
03-25-2003
Images archived
BASIC
INFORMATION 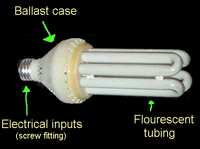
Compact fluorescents are close
relatives of the 4ft tube fluorescents, commonly used in
shops and schools for their white, soft light that does
not cast any defined shadows. These lights are long
tubes, usually 4ft long, filled with a gas that releases
a photon of light when excited by electricity. The
electricity is passed through the tube from the metal
sections at either end, thus exciting the gas within and
releasing photons of light. These lights must have a
'starter' which gets the light going initially, unlike
incandescent which can just be turned on and off without
one. Regular fluorescents usually emit 18w of light per
tube, and cannot be plugged straight into a wall socket.
Compact fluorescents, on the other hand, are
made for use in regular light sockets, and can easily be
installed by anyone with basic handyman skills. Compact
fluorescents are usually around 8inches long (not
including the ballast, which usually adds about 3 inches
to the total length) and emit minimal amounts of heat
from the globe itself. Most of the heat emitted from a
compact fluorescent comes from the ballast. These lights
are usually between 8w and 27w, although some variation
may occur between brands and uses.
The main
reason people choose CF's over regular fluoro's is their
compact ability! They are very 'movable' and can be
positioned almost everywhere. They put out MUCH more
light than their bigger cousins, while using only a
fraction of the space.
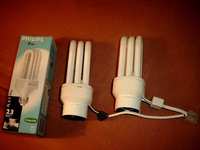
Some of the many
varieties of compact fluorescents. 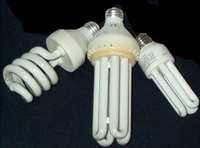 Image contributed
by: Locutus NON-CULTIVATION USE OF
COMPACT FLUORESCENTS
Image contributed
by: Locutus NON-CULTIVATION USE OF
COMPACT FLUORESCENTS If you're running a
large grow setup, and you're concerned about the spike
in electricity, replace your regular light bulbs with
compact fluoros around the house! They give off the
same light, using only a fraction of the electricity. If
you're running a HID light, and the electricity increase
could kill you financially, or you're just worried about
LEO, it might be a good idea to replace incandescent
with compact fluoros. As an example, a 100w
incandescent uses most of its energy giving off heat. If
you replace all these 100w incandescent bulbs with ~20w
energy saving compact fluoro's, you can dramatically
reduce your energy bill, and help the environment at the
same time. In fact, I recommend changing all your lights
to CF's regardless of your growing situation, as they
will save you $$ in the long-term, and save the
environment.
The advantage with these lights is
that the conversion from incandescent isn't complicated!
Simply un-screw the old bulb, and screw in a compact
fluoro! Done! You're on your way to energy saving
paradise!
THE USE OF FLUORO'S FOR GROWING
CANNABIS Every grower has, or still uses
these lights. Although they dont even come close to the
results from a HID light, they do however provide a
cheap alternative for a newbie 'dabbling' in the fine
art of growing. Instead of spending hundreds of dollars
on an HID light, a newbie can purchase a compact
fluorescent for a few bucks, and still have money for a
coffee on the way home.
These lights are also
excellent for starting seedlings and clones, as their
cool light will not dry out the soil as fast as an HID.
They have a low intensity, and are gentle on newly
germinated seedlings, and are great for clones as they
wont dry them out or give them too much of an early
blast.
Compact fluoro's are also great for
stealth grows, as they can be kept about 1 inch from the
plants, and do not require extensive heat ventilation
due to their warm operating temperature.
WHERE CAN I PURCHASE THESE LIGHTS?
Most lighting stores will sell them, but watch
out, prices are very different depending on what type of
shop you get them at! As lighting shops only sell
lighting equipment, their prices can either be high or
low, it really depends on the type of lighting shop it
is. A designer lighting shop may end up being much more
expensive, as they tend to be more directed towards the
upper-class designer type customer, which extra $$ to
spend. Hardwares sell them, but their variety of lights
is usually limited. Electricians, and assorted
electrical shops will sell them, and this is most likely
where you will get the best range and the best prices.
My advice to you is, shop around! You wont regret it
when you can save around 30% per light.
WHICH TYPE OF COMPACT FLUORESCENT LIGHT
TO CHOOSE For anyone growing cannabis, it is
pointless to buy a weak light. Given the option of 8w,
15w and 27w, you would be stupid not to buy the 27watt,
as they are more or less the same price. Compare the
lumen output of each of the bulbs, different 27w bulbs
may have different lumen outputs (depending on the
manufacturer) and as with everything, the more lumens
the better. You will also be given 2 options, the screw
method of fitting, or the bayonet method (push and
turn). My preference is the bayonet fitting. Make sure
that you choose the right one for your socket! Also, do
not choose a regular compact fluoro. Pick the one with
the energy saving feature (will be explained why later
on in the document). Now, for vegetative growth you
should choose the 'cool white' light. This is also
acceptable for flowering, but a 'warm white' light will
be better as it is stronger in the red end of the light
spectrum which is more suitable for flowering.
INSTALLING YOUR COMPACT FLUORESCENT
Now, this is extremely easy. As these bulbs fit
normal light fixtures, you can just dismantle and old
lamp to get the cord, plug and bulb fixture. This is
ready made, as all you have to do is plug the cord into
a wall outlet and screw in a bulb (with the power turned
off, of course). This requires no electrical knowledge
at all, and is the easiest way to get a cord suitable
for a compact fluoro. The cord is simply removed from
the lamp, and you are ready. If you feel you are not up
to this task, or you do not have an old lamp ready to be
destroyed, you can easily make one of these cords with
basic electrical knowledge. Hardwares and electricians
will sell you the cable (you'll need at least 1 meter)
and the fittings for the wall socket and the light. Just
tell them you're making a lamp for pottery and need a
few cables to make up yourself. The parts are cheap, and
you can save $$$ this way. If you have any queries, the
electrical store will know exactly what type of cables
you need etc, and will be more than happy to give you
instructions on how to put it all together.
Please note that this is a guide for regular
compact fluoro's. There are some outdoor varieties
(which are rare) that need to be fitted specially. This
FAQ is written for the regular compact fluoros, the
ones that are most accessible to the general population.
Other varieties of compact fluoro's are hard to find,
but may or may not be better for growing. As I have
little experience with these rare lights, I cannot
comment on them. The reason I haven't seen them before,
is because they are almost non-existent where I live.
HOW DO I MAKE A SIMPLE REFLECTOR FOR YOUR
COMPACT FLUORESCENT? To build this reflector
you will need a regular soda can, any brand will do,
which you will need to rinse thoroughly until no residue
is left inside. You will also need a good pair or
scissor and a robust kitchen knife to cut the metal
accordingly. An alternate method to remove the lid,
would be to use a can opener. The lip of the lid can be
used, and it will cut it cleanly. These tools should be
chosen carefully as they will determine over failure or
success of this construction. A lack of caution and a
sharp metal edge can be fatal to your fingertips so
think twice if your tools are capable of doing the job.
How
and where to cut: Firstly, draw a plan of your
cutting path on the outside of the can using a permanent
marker or a wax crayon. This will aid you to get a
better overview of you plan and to avoid silly mistakes
on the way.
Cutting the top part of the can out
needs to be done first, adjusting the opening according
to the size of your bulb. You do not have to cut it
exactly to shape as glue (super or high-temp hot glue)
can be used to stick the reflector to the bulb ballast
later on. A can opener is the preffered tool for this
job. The reflector is purposely not covering the ballast
to ensure good aeration and to avoid damage to the
ballast components, resulting in a short circuit.
Next, you will need to cut the main part of your
soda can in half using your scissors. A hole may need to
be drilled first using your kitchen knife to get a good
starting point for the scissors.
The inside of
the can is coated with a thin plastic layer that should
not cause any trouble cutting through the sheet metal.
The bottom side of the can does not have to remain in
place but leaving it will add stability to the reflector
and enhance the reflectivity. An extra hole can be cut
into the bottom as well to improve ventilation along the
bulb or to connect a 50mm pc-fan to the end.
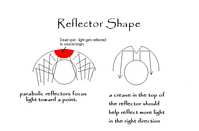
Lastly, two more cuts have to
be made into the sides of the semi-circle reflector to
ensure that the sides do not reflect the light back to
its origin but rather focus it to where it is needed.
The reflector can now be bent according to your light
requirements thus making it possible to focus it
directly on your plants. If your reflector does not
quite fit the bulb yet you can now use glue to stick it
to the ballast.
HOW DO I MODIFY MY
COMPACT FLUORESCENT? The main advantages of
modifying your compact fluorescent are:
Reduced
length of compact fluorescent
Reduced heat build
up (increased air-flow)
No need for pre-made light
sockets, saving you money
There is an even
cheaper and more compact solution than to spend the
extra cash on unnecessary light sockets and to end up
with less usable space due to clumsy fixtures. All these
problems can be avoided easily if one knows how to skips
wiring a bulb socket and instead going straight to
wiring the bulb itself. This requires some adjustments
and modifications of the bulb casing but it can be done
by simply following the steps provided.
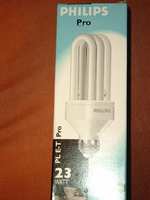
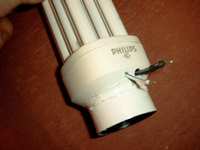
For this example I will use a
23W Phillips fluoro bulb which is ideally used in
confined spaces due to its compact size. The following
pictures will illustrate the process of re-wiring this
bulb and modifying it to meet the requirements of
compact size and low cost.
This is the bulb I
was referring to (23W, 1500 lumen)
Notice the
upside-down U shaped tubes. These will require less
airflow to cool the bulb as the air can move freely in
between the tubes unlike those of conventional
stick-like coils.
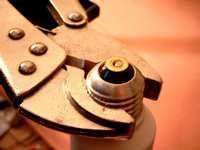
First, get a good pair of
bending or clamping tongs and squeeze them tightly to
the round connector plate of your CP fluoro and gently
twist it off.
Never twist it off in a COMPLETE
circular motion as the wires inside are still attached
to the receptor plates and can sometimes break/rip if
you apply too much pressure by twisting. Pulling is
better than twisting. You will end up with two different
wires sticking out the end. In this case, I cut the
remaining plastic bit off in order to reduce the overall
length of the bulb.
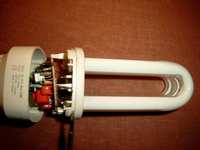
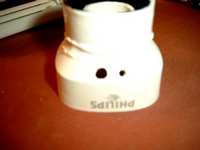
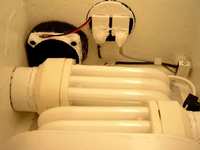
You will need to open the
bulb ballast in order to make 2 separate holes in the
plastic casing of the bulb for the two wires. This isn't
hard at all, you simply need to drive a screwdriver in
between the upper and the lower part of the casing and
gently push them apart. There will be no glue required
to stick them back together as the bulb has a
push-slide-lock mechanism that simply snaps them back
together. When you open the bulb, you should something
similar to this even though not all ballasts are the
same, depending on the manufacturer.
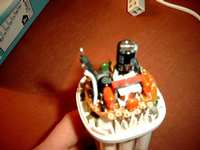
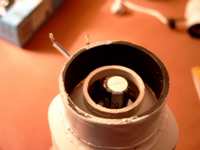
Now you need to drill two
holes at the appropriate height for the two wires to be
pulled through. Since its plastic that isn't all that
hard either and can even be done with a pair of
scissors.
After that, its just about
putting the pieces back together and making sure the
wires come through their designated hole. You can use
hot glue to hold those wires in place but this is not
recommended as the heat in that area of the bulb casing
is very intense. Use only High-Temp glue!
If you are short of space or
simply want a rigid construction, you can cut the bottom
plastic part of the bulb of and use a bigger piece to
distribute the weight more evenly. I used med-high
temperature translucent hot glue to fit a piece of a 2
black PVC pipe onto the end of the bulb thus completely
eliminating the need for a socket. This is just an
optional step, as the bulb will hold without the extra
support by simply gluing the sawed-off end to the
predestined wall.
(
ATTENTION: DO NOT USE
the regular LOW TEMP Hot glue as it will melt at
temperatures above 130 degrees Celsius which the bulb is
capable of generating. ONLY, when gluing something
DIRECTLY to the bulb casing, USE THE MEDIUM-HIGH temp.
Hot glue, which will withstand significantly higher
temperatures.)
Voila the final product of
which you can wire as many in series or parallel as you
desire. You can place these bulbs literally anywhere due
their compact size and the low heat production, keeping
in mind that the bare minimum between leaf tips and bulb
should be 1cm (2/5 of an inch). Anything closer will
result in prompt or delayed leaf burn.
This is just an example of how
well suited these bulbs are for small spaces such as
stealth boxes and small cloning chambers. It also
illustrates the importance of ventilation as the smaller
the box, the stronger the ventilation has to be to
exchange the hot air buildup sufficiently.
This method is ideal for those who wish to
wire a number of bulbs without spending even more money
on bulb sockets. These might seem cheap when compared to
the pricing of the bulb, but in the log run it is better
to save a few bucks here and instead invest them in
another area of growing or even another bulb. There is
no need to have a possibility of replacement as the
average lifetime guarantee on these bulbs lie between
10000 and 15000 hours, which means nearly two years of
continuous use.
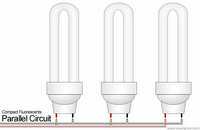
Wiring in CF's
parallel:(Image by tipzijuana)
 HOW MUCH LIGHT DO I
NEED TO VEG CANNABIS PROPERLY?
HOW MUCH LIGHT DO I
NEED TO VEG CANNABIS PROPERLY? It all
depends on what light you are using, if its HID,
standard fluoro or compact fluoro (I assume you're not
using halogens!). For HID (HPS or MH) lighting, use
roughly 30w per square foot, and for flowering use
around 60w per square foot. This is merely a guide, your
plant, light height; reflective surfaces etc make a huge
difference on these numbers. For a small plant, below
1ft tall, Id say you would need at least 25w of
fluorescent light. I find that it isn't at all practical
to use tube fluoros for the vegetative stage past 6
inches, as only the top of the plant is receiving enough
light to carry out photosynthesis properly.
Using an energy saving compact fluoro will help
'push' the light to the base of the plant, assisting
photosynthesis. If the plant indicates it needs more
light by growing slowly, and with small leaf petioles,
you may need more light. Go with the basic rule of
keeping the fluoros very close, and using roughly
20-30w per square foot for strong vegetative growth. If
you can afford to over-light your grow room, why not?
You wont regret it when your plant is bushy and healthy.
If you feel that you need to only purchase a minimum
amount of lights, you probably shouldnt be growing.
Growing takes effort and money, and if you can't
support a plants needs you might as well just forget
growing until you can afford a proper setup. Skimping on
lights is the biggest mistake a grower can make, because
photosynthesis is so important to for a health plant.
THE TRUTH ABOUT WATT RATINGS
When purchasing a compact fluorescent, you will
notice that nearly all of them have a larger number on
the box, than what it actually is. This number is the
lights comparison to the brightness of a standard
incandescent globe. Do not be fooled, this does not mean
that the light is 100w! It is most likely around 18w.
Now, here is where the myth behind these lights
is uncovered. Most people will say that you should
totally discard the brightness rating. This is wrong!
The brighter a light is, the more penetration it has.
With a usual, run-of-the-mill compact fluorescent (say,
15w) it emits only 15w of light with poor penetration.
An energy saving compact fluorescent with 15w of light,
which is rated to 100w of light, will only emit 15w of
light. The difference between the two is, the energy
saving light has a much stronger light penetration of
the normal one, while still only emitting 15w of light.
This is beneficial to growers because with a
larger plant, a normal 15w compact fluoro will
sufficiently light one part of the plant, and by the
time the light has reached the other side of the plant,
so much of the light has been lost that it is barely
worth having. With the energy saving compact
fluorescents, the light will travel to the other side of
the plant, and still have enough intensity for
reasonable results.
HANGING YOUR LIGHTS
OVER YOUR PLANTS Keep these lights under a
reflector all of the time to concentrate the light onto
the plant. Hang them horizontally, as most of the light
is given off by the middle of the tubes. Keep them close
to the plants. As a general rule of thumb, 1 inch away
from the top of the plant is perfect. Any more, and
you're wasting your time, and less and you risk burning
your plant (although these lights are very cool, it is
possible to burn your plant if it touches the light or
ballast for an extended period of time). If you're given
the option, go for a few compact fluoros positioned
around the plant, as opposed to 1 strong light at the
top. Positioning lights around the plant help stop
vertical stretching, and encourage the plant to bush
out.
WHY IS A HID "BETTER" THAN A COMPACT
FLUORESCENT? HID lighting is generally
accepted as a better light for growing cannabis for a
few reasons...
It has much better light
penetration
It is much more powerful (higher lumen
output)
It is stronger in light spectrums suited
for growing plants
What can we do to combat
these problems to make the most out of our fluoros?
Use a good reflector. Desk lamp reflectors are
perfect, along with coke cans (cut in half from top to
bottom).
Purchase lights with high energy saving
capabilities (e.g. high watt ratings)to increase light
penetration
Purchase lights with suitable spectrum
strengths for each phase of growing (eg warm white, cool
white etc.)
Keep the lights close to maximize
intensity
NOTES: For good
results, these lights must be used with a good quality
reflector. They give of 360 degrees of light (in a 2D
cross-section) but you will only really need 90 degrees
of light (maximum). Building a reflector will help
concentrate all the light to the area needed, instead of
wasting it lighting up the ceiling of your grow room!
Although you can successfully grow and flower
a cannabis plant under a fluorescent, your results will
be poor and you will most likely be disappointed. Use
these lights only for seedlings and clones, and perhaps
the vegetative stage of the cycle. A HID light is
recommended for flowering.