How do I Build a Bato-Bucket/Dutch-Pot System?
| Added by:
MarvinM92 Last edited by:
snoofer Viewed: 500 times |
Rated by 16 users:
9.00/10 |
Contributed by: FileError404
Submitted: 07-20-2003 Images archived: 2003
How do I Build a Bato-Bucket/Dutch-Pot
System? Introduction: Here is
my photo-report on building a Bato-Bucket, also called
Dutch-pots, system. It is a very efficient top-drip
set-up, easy to use and very safe. No more fear of power
outage, the bato buckets have a 2l (about 1/2 Gallon)
reservoir built in, that works as a wick system if
nothing comes from above. The other big advantage over
other drip systems like tube, tubbler or slab set-ups is
that the plants are in individual containers that can be
moved around, plus the (almost) 3 gallon container
provides enough space for the root-mass. Batos have been
around for years with proven results but lately haven't
been seen that much. You might have seen the
bato buckets in a system called "Eve's Garden", which is
a "Brand" product and therefore costs about $350 for a 6
pot and up to $600 for a 12 bucket system... OUCH! That
might be the reason for the decline of the batos in the
community. Parts & Price List:
Bato Bucket: $4.90 each 16x $4.90 $78.40
PVC Pipe: $3.85 per 10 feet. 25' x 0.385 $9.62
PVC Fittings: $0.50 - 2.00 a piece. 8x $1 $ 8
Feedline: $11 for 50', can also be bought in 10' for
less than $5. 50' $11
Feedline Links: $0.70 - $1.50 T, Elbow, shut-off
valves, riser, endcaps 7 x misc. $15
Drippers: $$0.75 - 1.25 a piece. (Including
couplings) 32 x $1.25 $40
Drip-line: $9 per 50 feet. 50' $ 9
MAG Pump: $30, but smaller pump would do. Mag has
low heat and energy use.1x $30
Wooden planks: $7 each 4x $28
Perlite: $18 per 24lbs. bag. 2x (1.5 used) $27
This is a grand total of $191.02! Pretty good
savings if you ask me.
Getting
Started:
First you'll have to measure your
space and decide how many buckets you will want to use.
You can design this system as big or small as you like.
In this FAQ, we build a 16 bucket system. Each bato
measures 10"x12"x9". 4x 5' Rows with 4 batos each. We
space the buckets 16" at center. You can space them
wider or closer, depending on how long you're planning
to veg. The rows are 20" on center which fits the
footprint of the 1K light and reflector I'm using. Store
price (without the light) would be about $750.
The batos are designed to be drained by 1 1/2"
PVC pipe, which means the drains plug right into the
pipe which in turn stabilizes the bucket. 10' PVC pipe
cost's less than $4 and they will cut it for you to size
at Home Depot.
Constructing the Drain
System:
First we measure and mark our PVC
pipe where the hole for the drains will be drilled. I
used a pair of pruning scissors to get a little groove
into the PVC, so the drill bit with the pointy end would
grip right away. It worked great. A 3/4" drill bit would
be enough but I went a bit larger. Now drill out holes
for the bucket-drains.
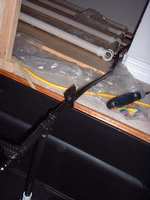
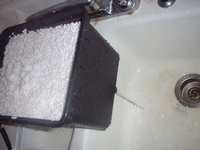
Here's
the bato bucket, you can see the reservoir. Two elbows
are combined for one drain fitting. This way, the water
always siphons out from the bottom and never leaves
stale water in the bucket. The next pisture shows how
the bato drain-plug fits into the PVC pipe. The buckets
are the same just a different color.
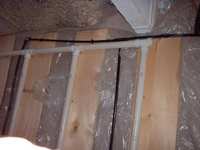
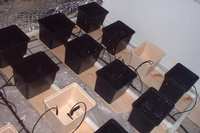
 Here's the
layout, assembled in the room. Since in this set-up, the
reservoir is 2' lower than the system, it's easy to
drain. I just put a slight angle on it by raising the
long side of the pipes about 2" and the downward pipe
that leads to the reservoir about 1". If your reservoir
is in the same room, you'll have raise the buckets so
gravity can do it's thing. I've seen PVC structures,
tables and the common "sawhorse" set-up. Here's the
layout, assembled in the room. Since in this set-up, the
reservoir is 2' lower than the system, it's easy to
drain. I just put a slight angle on it by raising the
long side of the pipes about 2" and the downward pipe
that leads to the reservoir about 1". If your reservoir
is in the same room, you'll have raise the buckets so
gravity can do it's thing. I've seen PVC structures,
tables and the common "sawhorse" set-up.
You
will of course have to figure out how many T-fittings
and elbows you'll need to construct the drain pipe.
($0.50 - $2 a piece) It's really very easy to piece this
together an Erector set would be way more complicated.
Make sure you get PVC Primer and PVC Cement to make sure
they are leak-proof.
One more important point
about the PVC pipes: They are dirty when you buy them.
Take the time to wash them with a bleach solution to
sterilize everything. I scrubbed them on the outside,
and used a long stick to shove a big sponge with
bleach-water through them. Rinse very well and let them
be for at least a day before using. After all, your
girls' food will run through those pipes.
Constructing the Feeding System:
 Now that
the drain system is established we have to worry abut
the feeding of the plants. Now that
the drain system is established we have to worry abut
the feeding of the plants.
I use a MAG-drive
pump with a rate of 250gph (Gallons per Hour) The pump
is placed in the reservoir (or outside if you want to
use the pump in-line). A 1' riser is connected to the
output via a female/female adapter. (Risers only come
male/male and the pump's output is also always male). I
screwed a T- piece to the top to split the output. One
side goes back to the res for mixing and pressure
adjustment via a shut-off valve, the other side goes to
the feed-line, also with a shut-off valve in between.
 I placed
two lines between the 4 rows of buckets (1 line for 2
rows) via one t and one elbow connector. The feed line
comes rolled up and is very hard to straighten. It rolls
right back up when straightend which is a pain in the
ass. I got some fasteners to nail it to the floor. Both
lines end with an end-cap. The T's and Elbows are
totally drip-proof. I was worried at first but I ran
some tests, actually trying very hard to rip apart the
connections but to no availe... I placed
two lines between the 4 rows of buckets (1 line for 2
rows) via one t and one elbow connector. The feed line
comes rolled up and is very hard to straighten. It rolls
right back up when straightend which is a pain in the
ass. I got some fasteners to nail it to the floor. Both
lines end with an end-cap. The T's and Elbows are
totally drip-proof. I was worried at first but I ran
some tests, actually trying very hard to rip apart the
connections but to no availe...
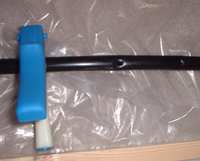 Now you'll
need a hole-punch. This one in the pic is a little more
expensive and easier to use but they're available for
about $3. Figure out how many drippers you need and
punch holes into the feedline at an even distance. Now you'll
need a hole-punch. This one in the pic is a little more
expensive and easier to use but they're available for
about $3. Figure out how many drippers you need and
punch holes into the feedline at an even distance.
You put your 1/4"
connectors into the holes of the feed line, in this case
they came with the drippers. Again, these plugs are
tight and a perfect fit. If you punch a hole at a wrong
position you can get a "goof-plug" to fix it. I use
these, from 0-10gph adjustable drippers, available at
Home Depot Or Lowes. Connect your drip-line to the 1/4"
connector and then to the dripper. Use 2 drippers per
bucket.
Here's
what the set-up looks like without the buckets.
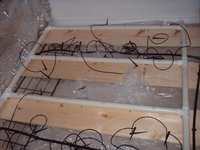
 And now with the buckets for a test-run.
I let it run for an hour or so, double check all the
connections before filling the buckets. I run the pump
for 5 minutes every 3 hours and have the drippers set at
about 3gph. I forgot to time the res-cycle time but I
guess at this flow rate it would be around 8-10 minutes. And now with the buckets for a test-run.
I let it run for an hour or so, double check all the
connections before filling the buckets. I run the pump
for 5 minutes every 3 hours and have the drippers set at
about 3gph. I forgot to time the res-cycle time but I
guess at this flow rate it would be around 8-10 minutes.
The batos run well with all kinds of media: coco
coir, clay, lava rocks, granulated rockwool but perlite
is the most common medium. It's relatively cheap,
provides stability and keeps light from the roots. A 24
lbs. bag will fill about 10 buckets.
 First you fill the buckets just to the
top of the little 1/2" ledge they have. Now the perlite
has to be thoroughly watered. Water it till the bucket
starts to drain and go a minute longer (you want to make
sure it's pretty dirt free so you don't clog your
connectors). Now drain the entire bucket since you don't
want plain, unadjusted water remaining in the bucket's
reservoir. First you fill the buckets just to the
top of the little 1/2" ledge they have. Now the perlite
has to be thoroughly watered. Water it till the bucket
starts to drain and go a minute longer (you want to make
sure it's pretty dirt free so you don't clog your
connectors). Now drain the entire bucket since you don't
want plain, unadjusted water remaining in the bucket's
reservoir.
The Outcome:
Here
are my clones. Next shot is a week later. Followed by
the final product!
|
| Last modified: 04:12 - Oct 28,
2003 |
| |


